Learn the Language of Babies: The 5 Cries of Babies by Priscilla Dunstan

Fascinating video! Priscilla Dunstan was born with a unique gift that helped her to figure out that all babies have 5 universal "words" that they use to communicate their needs. Watch this video to learn what your baby is trying to say.


0 comments:

Free Video Course - How to Play the Piano

learn how to play the piano for free 

Learn how to play the piano with this video course: http://www.youtube.com/playlist?list=PLUyDmNalB0ri0KoNmwPDtHMrwB0l8qvrP 

Over 39 practical lessons plus theory lessons.

For assignments and playing examples go to http://lessonsontheweb.wikispaces.com/


0 comments:

100 Things Every Guy Should Know


0 comments:

Learn to Draw - 98 Free Drawing Lessons

by Lara Whybrow


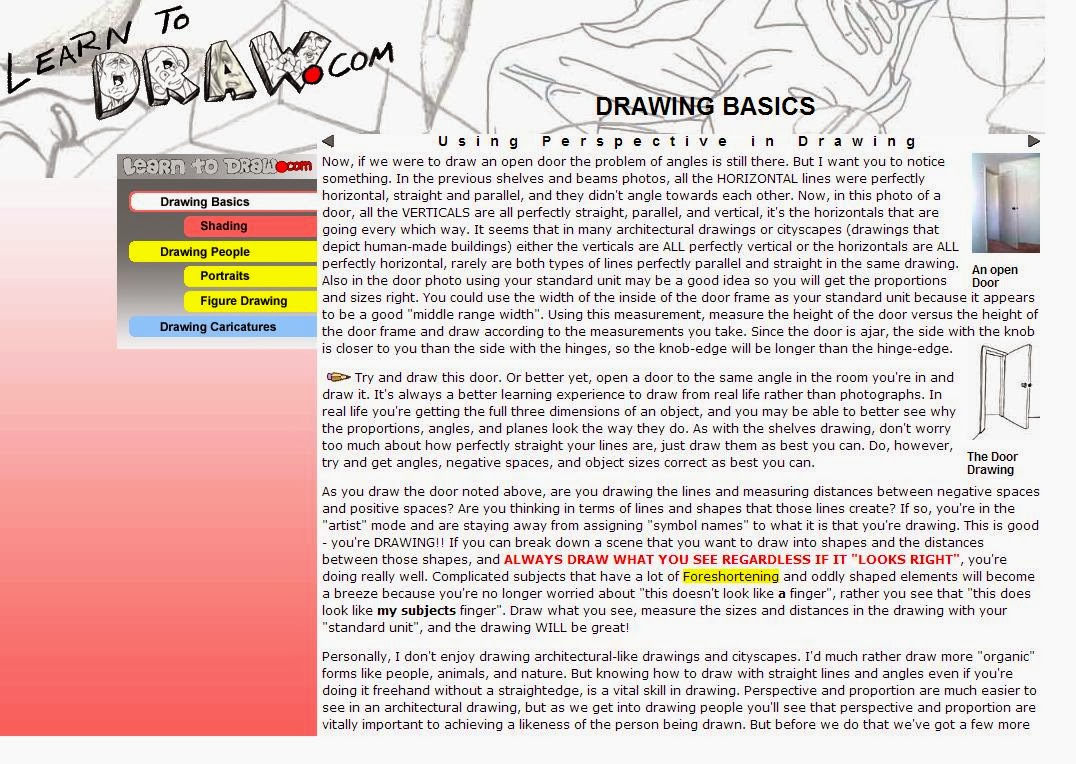
This website offers a lot of information about drawing. There are lessons on perspective, proportion, foreshortening, different pencils to use and other useful lessons and advice. The site is divided into three sections: Drawing Basics, Drawing People (portraits and figures) and Drawing Caricatures. In total there are 98 lessons. 


0 comments:

How to Make Your Own Perfume Oil (from Sweet Tea Apothecary)

from: Sweet Tea Apothecary
Below is an extract, please read the full article at Sweet Tea Apothecary

  • If you’re a perfume junkie but tired of wearing the same scents as everyone else with access to Bloomingdales, maybe it’s time you learned to make your own bottle of perfume. The good news: it’s really easy to do and if you already know what your favorite ingredients are, you’re set. The mildly annoying news: the ingredients you use and the amount therein can change a perfume from amazing to awful in a snap. Making your own perfume is all about patience and experimentation… but if you like playing mad scientist/alchemist and you’re dedicated, then it’s really quite a lot of fun.
    The Basics: Here’s where your childhood piano lessons come to use
    All of the lovely smells dancing in your head right now – rose, lilac, orange, musk – those are called notes. You know how snooty people take a sip of wine and swirl it around their mouth before spitting it out and being all like, “It has a hint of cherry and tastes of the soil of the Burgundy region” (confession: I go to wine country a lot) – well that’s kind of similar. The notes you smell all work together to make up a chord. A chord is composed of a base note, a heart note, and a head note. The base note is the one that lasts the longest and is usually something like vanilla or sandalwood. The heart note is the middle note which is generally floral. The head note is exactly that – a heady, strong smell that hits you right out of the bottle. One or more chords make up the composition (formula) of the perfume. So in non-musician speak let’s say you have sandalwood, jasmine, and orange. That is one chord – sandalwood is the base, jasmine the heart and orange the head.
    Your head note is the most fleeting as they have an explosive scent and evaporate quickly. Over time, you will notice the scent changes – melts even – into the heart and base notes. It’s very subtle and beautiful when you think about it.
    How do you pick the right oils to go together?
    That really depends on you. What kind of perfume do you go for? Woodsy, citrus, floral, musky? My completely scientific process  of choosing oil combinations starts by me imagining what certain famous people would have worn. Marie Antoinette was a straight up flower. Queen Elizabeth I had migraines so I stick to marjoram. Think about the scents you like and pick a few based on that. Here are some ideas:
    Woodsy: Cedarwood, Pine, Sandalwood
    Floral: Jasmine, Rose, Ylang Ylang
    Fruity: Grapefruit, Orange, Bergamot
    Earthy: Vetiver, Musk
    Herbal: Rosemary, Lavender, Chamomile
    Spicy: Black pepper, Clove, Ginger
    Sugary: Amber, Vanilla
    A few more tid-bits of info before we get started
    Order matters people! Once you have decided which ingredients will comprise your base, head and heart notes, make sure you add base first, heart second and head last.
    For today’s lesson, we will be making a 5ml bottle of perfume oil. Perfume oil is my favorite right now because it contains no alcohol, just skin loving Jojoba or Sweet Almond Oil – your preference. These are lean in closer perfumes as opposed to the heady fill the room type – especially amazing if you are headache prone like me. Perfume oils are also more bang for your buck because they can last anywhere between 5-12 hours depending on the strength of the ingredients you use. Compare that to eau de parfum (the regular alcohol based perfume you will find in stores) that lasts 2 hours if you’re lucky. Also, no one likes the old lady who goes crazy with the rose water.
    The Maths. (Sorry)
    In a cruel twist of fate, the artistry of perfumery requires the use of a lot of math. Not hard math mind you, but.well.it’s.math. (I was an English major, I recoil at numbers). Every milliliter of liquid is roughly 20 drops with a pipette or glass dropper. As I stated earlier, today’s lesson is for a 5ml bottle of perfume. Sooo:
    5ml X 20drops = 100 drops total
    So you will have 100 drops of liquid in your bottle. The ratios of the notes are as follows:
    2 parts base : 1 part heart : 1 part head : Rest is carrier oil (Jojoba, Sweet Almond, etc)
    There is a huge range of concentration levels that vary across perfume brands. Generally perfume oils will have a 20 - 80% concentration of essential/fragrance oils to carrier. Let's say you want to have a nice light perfume that is 20% fragrance. 20% of 100 drops is 20 drops. This means that your fragrance combination will amount to 20 drops and the remaining 80 drops will be carrier.
    Since we have 100 drops to account for and we now know the ratios, here is the formula we will be working with:
    10 drops base + 5 drops heart + 5 drops head + 80 drops carrier oil = 100 drops
    We did it! We survived the maths! Ok, now the fun can actually begin!
    ***Keep in mind, that is a basic super easy way of dividing up the oils. Generally, once you've figured out your ratio / drop number, you don't have to follow that to a T. You could have 12 drops base, 5 drops heart, and 3 drops head if you want to. It's really dependent on the strength and smell of your oils and you generally want more base and heart than head. This is all about experimentation.***
    What You Will Need
     
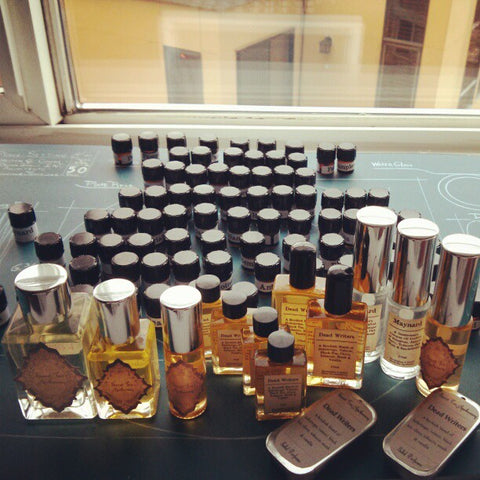
    Your supplies should look something like this
    1 – 5ml bottle, preferably with roll on ball; you can order online or go to your local health food store and pick up an amber vial or dropper bottle.
    3 essential oils or fragrance oils depending on what you want. If you want all natural perfume, only use essential oils. Fragrance oils can contain synthetics but have already been diluted in carrier oil so they tend to be less irritating. When choosing essential oils, make sure to look up any health advisories they may have as not all EOs are skin safe. Brambleberry  has a nice, affordable selection of both EOs and fragrance oils.
    4 pipettes or glass droppers; 1 for each EO and 1 for the carrier
    Jojoba or Sweet Almond Oil. Trader Joe’s  has a nice Jojoba in their spa section that is both affordable and great for dry skin beyond your perfuming needs.
    Tag or label for your perfume ; I usually just use some masking tape when I’m experimenting.

0 comments:

Simplest Way to Layer Your Hair at Home: Video

This easy way to layer your own hair at home really works. 


0 comments:

How To Cut Hair: 2 Videos


Knowing how to cut hair could come in handy if your child needs a haircut and you don't have much money spare. You could even help a friend out if he or she needs a trim for a job interview, for example. There are more hair cutting videos on this site, check the tag cloud. 


Part 1


Part 2: 


0 comments:

Learn to play the guitar - 24 free lessons

by Lara Whybrow


Guitar Tricks is a great site to learn how to play the guitar. I particularly like the way they start with the absolute fundamentals - what is a pick, how to hold the guitar for left and right handed people, the parts of the guitar, etc before moving on to how to play chords and switching chords. They actually boast that you can play your first solo in 15 minutes! 

For 24 free video lessons from 12 instructors, go to http://www.guitartricks.com/
You get 24 lessons for free but you can pay $14.95 for a full membership. 

0 comments:

Learn to play the drums without a drum set - 12 lessons from Dan on Youtube

by Lara Whybrow


Many people want to learn how to play the drums but are discouraged because they feel they need to buy a drum set first and don't want to invest in an instrument until they know they will actually make good use of it. 
Learning drum basics can be easy and fun and all you need is a good pair of drumsticks. For South Africans, you can buy these for around R100. Once you have mastered the basics and want to take things to the next level you can start thinking about a proper drum set. 


Here is set of 12 video lessons from Dan on Youtube

Lesson 1


Lesson 2


Lesson 3


Lesson 4


Lesson 5


Lesson 6


Lesson 7


Lesson 8


Lesson 9


Lesson 10


Lesson 11


Lesson 12


0 comments:

Improve your vocabulary and help feed the poor at the same time!

by Lara Whybrow


If you are a native English speaker or an ESL student looking to improve your vocabulary then Freerice is a great site to use. You get given a word and four options and you need to choose the option that best matches the meaning of the given word. And for ESL learners there is an option to hear the word so you can check your pronunciation of these new words too. 

You start off at level one and as you answer the questions correctly, so you move up in increasingly difficult levels. But the best part of all this is that for each correct answer you donate rice to the World Food Programme

Here is what the starting page looks like for level 1:


And then it gets a lot harder at level 40!


If you would like to play Freerice then go to their website (www.freerice.com) or join the Quick Easy English Group http://freerice.com/frog/join/2711836/66d6ff5c6488ae793555499cb5fd73dc

0 comments:

5 Muay Thai Kickboxing Kicking Techniques (VIDEO)

1 comments:

How to do Plyometrics

0 comments:

Learn how to make balloon animals (this could even be a lucrative part-time job)

by Lara Whybrow


Need some extra cash? Well here's an idea: hire yourself out as an entertainer for kid's parties. You can do this on the weekends, when you are not working and each session should only take an hour, maybe even less. Kids get bored after a while anyway. You could do 5 or 6 sessions a week and make a nice bit of extra cash. Maybe you need cash to get out of debt, maybe you would like funds to do some home improvements or you want to go on holiday - the choices are endless! And making balloon animals is not as hard as you might think. 

While you wait for those party bookings to come in, you could make balloon animals for kids at the malls. Sometimes you need permission from mall management to do this, sometimes not. You could always stand outside the mall if doing it inside is a problem. 

If you are interested in learning how to make balloon animals, check out http://magic.about.com/od/balloon-animals-instructions/tp/Complete-Course-Balloon-Animals-For-Beginners.htm 

0 comments:

Learn Sign Language for Free

by Lara Whybrow


If you are interested in learning sign language, have a look at http://lifeprint.com/
Perhaps you are a teacher who would like to specialise in working with deaf children or perhaps you have someone in your family who is deaf. There are many instances where knowing sign language could help you in your job or your life. 

The infamous Thamsanqa Jantjie will be remembered for many years to come as the Fake Sign Language Interpreter at Nelson Mandela's funeral. This South African man made many South Africans feel embarrassed to be called a South African when he failed to do his job properly at one of the most-watched funerals in the world. 

Perhaps he should take advantage of the free sign language courses at http://lifeprint.com/ hey?

0 comments:

Learn Adobe Photoshop - Free Course

by Lara Whybrow


Adobe Photoshop is one of the most powerful and widely used graphic design software programs out there. If you would like to know how to design logos, enhance or manipulate pictures, create stunning presentations, etc then learning about Adobe Photoshop with this free course


Knowing Adobe Photoshop will definitely make you a more attractive employee to companies. The job market is so competitive these days and the more skills you have, the better your chances are of landing that job. 

If you are running a small business, you could design your own professional marketing material and create your own eye-catching graphics for your website and newsletters. This will help you to reduce your expenses. 


0 comments:

For the ladies: how to trim & cut your hair in layers (VIDEO)


StyleSuzi shows how to trim your own hair and style it into layers in this video. 
Check out StyleSuzi's Blog: http://stylesuzi.com/


0 comments:

Learn French with Alexa - 15 Free French Audio Lessons

by Lara Whybrow


This is one of the best sites to learn French via podcasts, in my opinion. You can learn basic French with 15 free 35 minute French podcasts (MP3's).
New words are taught, as well as the grammar surrounding them. The lessons are easy to follow and consist of the text of the lesson as well as the audio so that you can hear the spoken language. 

You get 15 free lessons, which cover all the basics in detail. If you buy a subscription for $99 a year, you get access to a lot more lessons - up to 30 in the Learning French series, plus many dictation lessons, grammar lessons, lessons about French slang, etc. 

Definitely one of the best places to learn French, in my opinion. 

1 comments:

How to Punch Harder


In this 5 minute video, Trav R from FightSmart teaches you about elastic recoil and how you can use this to punch harder. Getting a good punch in could mean the difference between getting away from your attacker or biting the dust...


0 comments:

Improve your Resumé - Get a free Diploma in Customer Service

by Lara Whybrow


Do you work in the Customer Care industry? Are you looking for a job in the Customer Care industry? Get a free Diploma in Customer Care from www.alison.com and improve your resumé. 

After completing this course you will be able to:

- Apply the fundamental aspects of customer service in a business; 
- Advance a customer service program from a fundamental to advanced level; 
- Communicate and collaborate with customers utilising efficient communication processes; 
- Obtain customer feedback to continuously refine a customer service program; 
- Implement a customer service program in the hospitality industry, the retail industry and the public sector.

0 comments:

Expand your vocabulary with Vocabulary.com - for native English speakers or ESL students

by Lara Whybrow


One of my favourite sites is www.vocabulary.com. As an English teacher I need to make sure that my vocabulary is pretty damn good and even though I read A LOT of books, even I can learn a new word or two from vocabulary.com! 

The great thing about this website is that it determines your vocabulary level and then once your level is determined, the vocabulary quizzes are tailored to help you. As you continue, the website tracks words that you didn't know and shows them to you repeatedly till you get it right. 

It also has loads of other interesting features - for example if you are trying to think of word for a loud sound, you can search the database with  text:loud +typeof:sound and it will return with a whole bunch of synonyms. You can also view vocabulary for parts of cars, bicycles, etc. Nifty!


If you have signed up to the site, all your progress is recorded. This is a great motivational tool because people love to achieve! 

All in all, this is a great site for anyone interested in improving their vocabulary. 

0 comments:

How To Start a Fire Without Matches (you can even use a can and a chocolate!)


by Brett & Kate McKay


There is a primal link between man and fire. Every man should know how to start one. A manly man knows how to start one without matches. It’s an essential survival skill. You never know when you’ll find yourself in a situation where you’ll need a fire, but you don’t have matches. Maybe your single engine plane goes down while you’re flying over the Alaskan wilderness, like the kid in Hatchet. Or perhaps you’re out camping and you lose your backpack in a tussle with a bear. It need not be something as dramatic at these situations-even extremely windy or wet conditions can render matches virtually uselessly. And whether or not you ever need to call upon these skills, it’s just damn cool to know you can start a fire, whenever and wherever you are.


Friction Based Fire Making
Friction based fire making is not for the faint of heart. It’s probably the most difficult of all the non-match based methods. There are different techniques you can use to make a fire with friction, but the most important aspect is the type of wood you use for the fire board and spindle.

The spindle is the stick you’ll use to spin in order to create the friction between it and the fireboard. If you create enough friction between the spindle and the fireboard, you can create an ember that can be used to create a fire. Cottonwood, juniper, aspen, willow, cedar, cypress, and walnut make the best fire board and spindle sets.

Before you can use wood to start a friction based fire, the wood must be bone dry. If the wood isn’t dry, you’ll have to dry it out first.

The Hand Drill

The hand drill method is the most primitive, the most primal, and the most difficult to do All you need is wood, tireless hands, and some gritty determination. Therefore, it’ll put more hair on your chest than any other method. Here’s how it’s done:

Build a tinder nest. Your tinder nest will be used to create the flame you get from the spark you’re about to create. Make a tinder nest out of anything that catches fire easily, like dry grass, leaves, and bark.

Make your notch. Cut a v-shaped notch into your fire board and make a small depression adjacent to it.

Place bark underneath the notch. The bark will be used to catch an ember from the friction between the spindle and fireboard.

Start spinning. Place the spindle into the depression on your fire board. Your spindle should be about 2 feet long for this to work properly. Maintain pressure on the board and start rolling the spindle between your hands, running them quickly down the spindle. Keep doing this until an ember is formed on the fireboard.

Start a fire! Once you see a glowing ember, tap the fire board to drop you ember onto the piece of bark. Transfer the bark to your nest of tinder. Gently blow on it to start your flame.

Fire Plough

Prepare your fireboard. Cut a groove in the fireboard. This will be your track for the spindle.

Rub! Take the tip of your spindle and place it in the groove of your fireboard. Start rubbing the tip of the spindle up and down the groove.

Start a fire. Have your tinder nest at the end of the fireboard, so that you’ll plow embers into as you’re rubbing. Once you catch one, blow the nest gently and get that fire going.
Bow Drill


The bow drill is probably the most effective friction based method to use because it’s easier to maintain the speed and pressure you need to create enough friction to start a fire. In addition to the spindle and fireboard, you’ll also need a socket and a bow.

Get a socket The socket is used to put pressure on the other end of the spindle as you’re rotating it with the bow. The socket can be a stone or another piece of wood. If you use another piece of wood, try to find a harder piece than what you’re using for the spindle. Wood with sap and oil are good as it creates a lubricant between the spindle and the socket.

Make your bow. The bow should be about as long as your arm. Use a flexible piece of wood that has a slight curve. The string of the bow can be anything. A shoelace, rope, or strip of rawhide works great. Just find something that won’t break. String up your bow and you’re ready to go.

Prepare the fireboard. Cut a v-shaped notch and create a depression adjacent to it in the fireboard. Underneath the notch, place your tinder.

String up the spindle. Catch the spindle in a loop of the bow string. Place one end of the spindle in the fireboard and apply pressure on the other end with your socket.

Start sawing. Using your bow, start sawing back and forth. You’ve basically created a rudimentary mechanical drill. The spindle should be rotating quickly. Keep sawing until you create an ember.

Make you fire. Drop the ember into the tinder nest and blow on it gently. You got yourself a fire.
Flint and Steel


This is an old standby. It’s always a good idea to carry around a good flint and steel set with you on a camping trip. Matches can get wet and be become pretty much useless, but you can still get a spark from putting steel to a good piece of flint. Sweedish Firesteel-Army model is a good set to use.


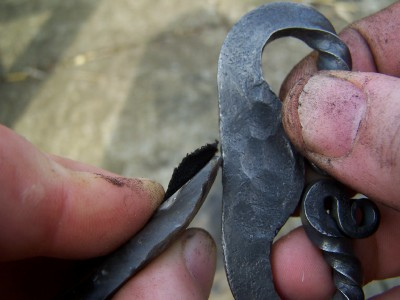
If you’re caught without a flint and steel set, you can always improvise by using quartzite and the steel blade of your pocket knife (You are carrying your pocket knife, aren’t you?). You’ll also need char. Char is cloth that has been turned into charcoal. Char catches a spark and keeps it smoldering without bursting into flames. If you don’t’ have char, a piece of fungus or birch will do.

Grip the rock and char cloth. Take hold of the piece of rock between your thumb and forefinger. Make sure an edge is hanging out about 2 or 3 inches. Grasp the char between your thumb and the flint.

Strike! Grasp the back of the steel striker or use the back of your knife blade. Strike the steel against the flint several times. Sparks from the steel will fly off and land on the char cloth, causing a glow.

Start a fire. Fold up your char cloth into the tinder nest and gently blow on it to start a flame.
Lens Based Methods

Photo by spacepleb

Using a lens to start a fire is an easy matchless method. Any boy who has melted green plastic army men with a magnifying glass will know how to do this. If you have by chance never melted green plastic army men, here’s how to do it.

Traditional Lenses

To create a fire, all you need is some sort of lens in order to focus sunlight on a specific spot. A magnifying glass, eyeglasses, or binocular lenses all work. If you add some water to the lens, you can intensify the beam. Angle the lens towards the sun in order to focus the beam into as small an area as possible. Put your tinder nest under this spot and you’ll soon have yourself a fire.

The only drawback to the lens based method is that it only works when you have sun. So if it’s night time or overcast, you won’t have any luck.

In addition to the typical lens method, there are three odd but effective lens based methods to start a fire as well.

Balloons and Condoms

By filling a balloon or condom with water, you can transform these ordinary objects into fire creating lenses.

Fill the condom or balloon with water and tie off the end. You’ll want to make it as spherical as possible. Don’t make the inflated balloon or condom too big or it will distort the sunlight’s focal point. Squeeze the balloon to find a shape that gives you a sharp circle of light. Try squeezing the condom in the middle to form two smaller lenses.

Condoms and balloons both have a shorter focal length than an ordinary lens. Hold them 1 to 2 inches from your tinder.

Fire from ice

Fire from ice isn’t just some dumb cliché used for high school prom themes. You can actually make fire from a piece of ice. All you need to do is form the ice into a lens shape and then use it as you would when starting a fire with any other lens. This method can be particularly handy for wintertime camping.

Get clear water. For this to work, the ice must be clear. If it’s cloudy or has other impurities, it’s not going to work. The best way to get a clear ice block is to fill up a bowl, cup, or a container made out of foil with clear lake or pond water or melted snow. Let it freeze until it forms ice. Your block should be about 2 inches thick for this to work.

Form your lens. Use your knife to shape the ice into a lens. Remember a lens shape is thicker in the middle and narrower near the edges.

Polish your lens. After you get the rough shape of a lens, finish the shaping of it by polishing it with your hands. The heat from your hands will melt the ice enough so you get a nice smooth surface.

Start a fire. Angle your ice lens towards the sun just as you would any other lens. Focus the light on your tinder nest and watch as you make a once stupid cliché come to life.

The Coke Can and Chocolate Bar

I saw this method in a YouTube video a while back ago and thought it was pretty damn cool. All you need is a soda can, a bar of chocolate, and a sunny day.

Polish the bottom of the soda can with the chocolate. Open up your bar of chocolate and start rubbing it on the bottom of the soda can. The chocolate acts as a polish and will make the bottom of the can shine like a mirror. If you don’t have chocolate with you, toothpaste also works.

Make your fire. After polishing the bottom of your can, what you have is essentially a parabolic mirror. Sunlight will reflect off the bottom of the can, forming a single focal point. It’s kind of like how a mirror telescope works.

Point the bottom of the can towards the sun. You’ll have created a highly focused ray of light aimed directly at your tinder. Place the tinder about an inch from the reflecting light’s focal point. In a few seconds you should have a flame.

While I can’t think of any time that I would be in the middle of nowhere with a can of Coke and chocolate bar, this method is still pretty cool.

Batteries and Steel Wool


Like the chocolate and soda can method, it’s hard to imagine a situation where you won’t have matches, but you will have some batteries and some steel wool. But hey, you never know. And it’s quite easy and fun to try at home.

Stretch out the Steel Wool. You want it to be about 6 inches long and a ½ inch wide.

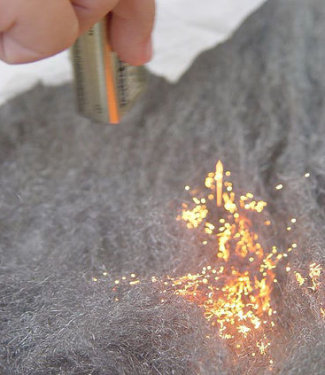
Rub the battery on the steel wool. Hold the steel wool in one hand and the battery in the other. Any battery will do, but 9 volt batteries work best. Rub the side of the battery with the “contacts” on the wool. The wool will begin to glow and burn. Gently blow on it.

Transfer the burning wool to your tinder nest. The wool’s flame will extinguish quickly, so don’t waste any time.

Sources:

Field and Stream

Primitive Ways

0 comments:

Learn a language with Busuu

by Lara Whybrow


If you are looking for a fun way to learn a new language for free, then try www.busuu.com. The site is a social network for language learners around the world and as a free learner you can select one language to learn. You can upgrade to a premium account which unlocks all the features. 

There are twelve languages to choose from:

English
Portuguese
German
Spanish
French
Italian
Russian
Polish 
Turkish
Arabic
Japanese
Chinese

The site is very easy to use and features an interactive "language garden" that visually depicts your progress as you complete language levels. The courses are simple yet effective. You also earn "Busuu berries" which can be used to get discounts on membership and animations for your language garden.


The Busuu dashboard featuring the language garden

0 comments:

Learn French for free @ www.alison.com


Alison offers free French lessons for beginners. Study at home at your own pace. Learning a new language can really enhance your career. You could find a better job if you speak a foreign language. 


Alison.com offers 3 different free video courses to help you learn French: 

Basic French Language Skills for Everyday Life 
Improving Your French Language Skills 
Mastering French Grammar and Vocabulary 


Learn Something New Today!


0 comments: